This is not your usual cornflake chicken tenders recipe. We add almonds and crushed red pepper to give a nice zing.
- 1 pint coleslaw store bought or homemade
- 1 1/2 pounds skinless, boneless chicken thighs
- 4 ten inch tortillas, optional
- vegetable oil for frying amount depends on the size of your pan
- 1/2 cup sauce see notes for suggestions
- 3 cups corn flakes use GF Cheerios for Gluten-Free
- 6 Tablespoons almonds, slivered or sliced
- 6 Tablespoons sugar
- 1 1/2 Tablespoons crushed red pepper less or leave out for those that don't like heat
- 1 Tablespoon kosher salt
- 2 large eggs you may need 3
- 2 Tablespoons milk
- 1 cup flour use almond flour for Gluten-Free
- 1/2 cup favorite sauce like comback sauce or honey mustard
-
Heat ½” oil in cast iron skillet (or other heavy duty skillet) over medium heat to reach 380 degrees. This may take 10 minutes.
-
Cut chicken thighs into roughly 1” X 4” strips. Cut any excess fat and discard.
-
In food processor add cornflakes, almonds, sugar, red pepper flakes and kosher salt. Run for about 30 seconds to coarsely chop. Transfer to a pie plate or shallow bowl.
In another pie plate or shallow bowl, mix egg and milk with a fork until well combined.
In a third pie plate or shallow bowl add 1 cup flour.
-
Dip the chicken strips in flour, gently shake to get excess flour off. Dip in egg mixture, rolling to make sure egg is on the entire piece of chicken. Roll in the cornflake breading.
-
Line a plate with paper towels or set a metal rack over a baking sheet to place the fried chicken on after removing from the oil. Place about 4-6 pieces of chicken, depending on the size of your skillet, in the oil. Don’t overcrowd.
Cook for about 4 minutes on the first side, flip when bottom is a nice golden brown and continue to cook for about 3 more minutes. Remove to rack or paper towel lined plate.
Continue with the rest of the chicken. Let the oil heat back up in between frying, for about a minute.
-
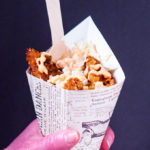
Serve with coleslaw. “The Mighty Cone” puts the chicken and the coleslaw in a tortilla to make a taco.
Oil Temperature Test: If you don’t have a thermometer the use the bread test by adding a small piece of bread to the oil, time for a minute. Judge whether to increase, decrease or keep the oil temperature the same by the color of the bread. You want a nice golden almost brown color.
Dipping Sauces: For kids or those that don’t care for spice use a honey-mustard sauce. For those that like heat use our comeback sauce or jalapeno tartar sauce.
Chicken: You should see some bubbles as soon as the chicken hits the oil. Don’t overcrowd the pan or the oil will decrease in temperature too much and you’ll end up with greasy chicken.
Is The Chicken Cooked? I always cut open the thickest piece of fried chicken to make sure that it’s cooked all the way through and/or isn’t overcooked. You want to see some nice juice beads on the chicken when you cut it open.
If using chicken thighs, the meat will have a slight pink color to it. Make sure that the juices are running clear. If using chicken breasts, the cooked meat will be white and clear juices.
On-The-G0-Snack: Paper cones are really great for eating snacks or meals on-the-go. If you use a cone, drop a couple of pieces of chicken in the bottom of the cone to build it up. Then add coleslaw and a couple more pieces of chicken. If you line the cone first with a warm tortilla then there’s no need for a fork.
To Make Gluten-Free – Replace flour with almond flour (or other gluten-free flour), make sure the corn flakes say gluten-free or use gluten-free cheerios, skip the tortilla or use gluten-free corn tortillas.
To Crush Cornflakes: If you don’t have a food processor you can put the breading ingredients in a large ziplock baggie. Roll with a rolling pin or crush with the back of a heavy pan.